

Fundamentals Cowl
- Connie Lee Lynch

- Mar 17, 2017
- 6 min read
Updated: Sep 15, 2022
Pattern also available as a downloadable pdf for purchase on Ravelry.
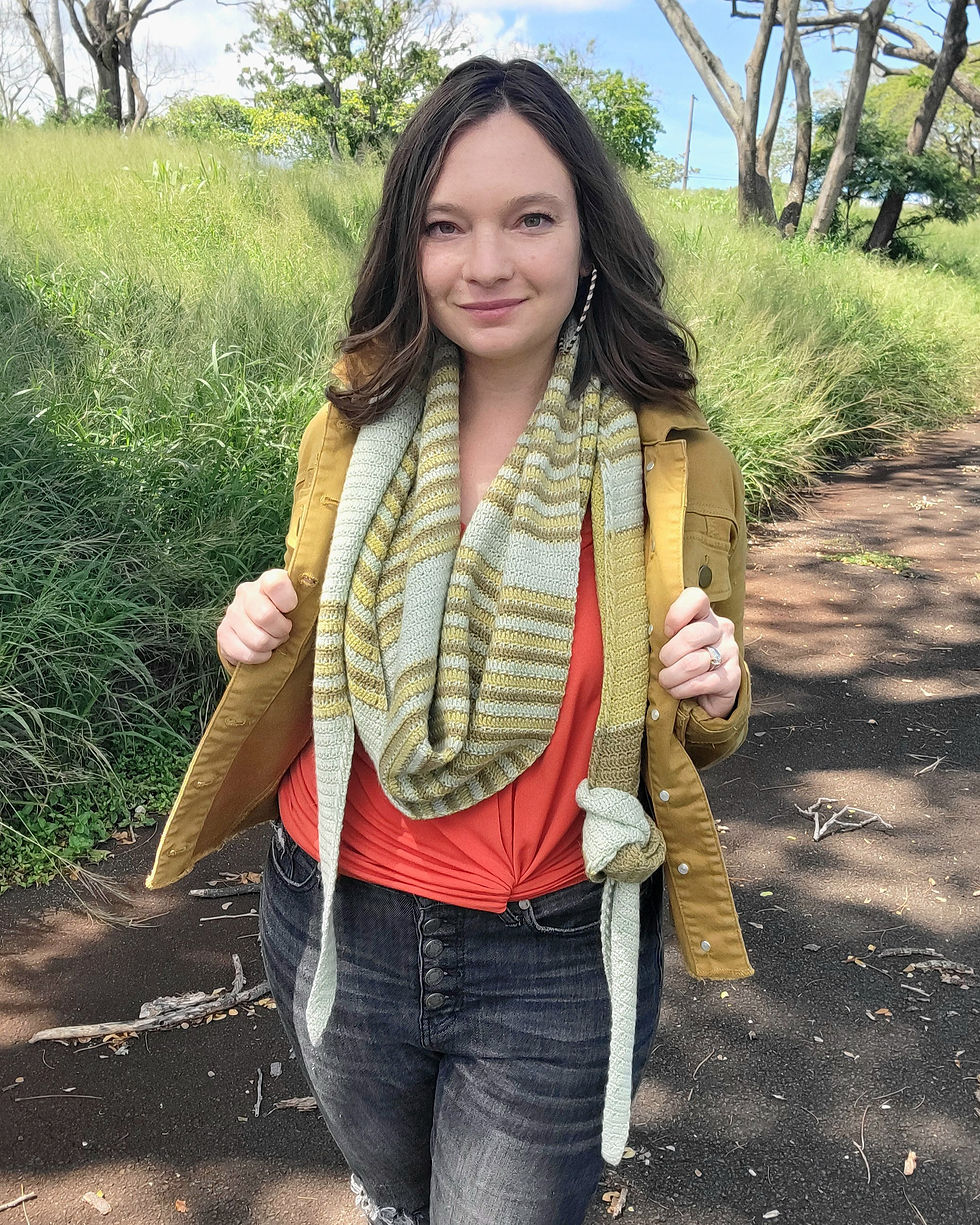
I grew up in the Ozarks and I've always had a soft spot for nature. Being out in the woods tromping around has always just made me feel like I'm home. Which is probably why I miss hiking so much. It's also probably why I adore this cowl! The simplicity combined with the gorgeous gradation between green and blue is like a breath of fresh air. In a peaceful meadow. With buttercups! Ah... It just makes me smile!

But let's talk about the pattern itself, shall we?
My goal with this project was experimentation with gauge. Or maybe as a tension test? Using four different crochet hooks with four different stitches may sound like a bit of a hassle, but it is an excellent way to test out and determine your natural tension, which can be really important once you move beyond simple, flat projects like scarves and blankets, where gauge doesn’t really matter into more interesting pieces, like fitted garments.
Now, I won’t lie, I’m a self admitted gauge swatch hater. Which is part of why most of my patterns are for items where gauge doesn’t really matter! But it DOES matter and you will benefit from a better understanding of your own natural tension at the very least.
I want you to use this pattern to help you determine if you are a loose, average, or tight stitcher. Please do keep in mind that none of these are bad, though! You will have a natural tendency to crochet a certain way and it’s much better for you to assess your tension and then adjust your tools to get the desired fabric than for you to try to change the way you crochet. That just leads to hand cramps, which are no fun for anyone.
So what I want you to do is to choose a yarn and take a look at the label and see what hook size they recommend. If you already know that you usually size up or down, then I want you to assign that adjusted hook size to your double crochet rows. If you have no idea what your tension is like, just start with the hook size that they recommend!
Choosing a gorgeous gradient yarn like one of Wollelfe's is a wonderful way to make a simple project like this look way fancier than it is, too. Especially when it's such a yummy fiber combo!
All right, it's time to get down to business here.
Let’s assume for a moment that you have a fairly regular tension, like I do. The yarn I used calls for a 3.5mm needle or hook. So for my double crochet rows, I used an E hook. For treble crochet rows, I went DOWN a hook size – they always seem to want to get loosey goosey, so we want to keep them in check with a smaller hook. I used a D/3.25mm hook. Half double crochets go UP a hook size with an F/3.75mm hook and single crochets go up two sizes with a G/4.0mm hook because it’s really easy to make these stitches too tight and we don't want them cramping our taller stitches' style!
The idea here is to let your TOOL do the work. Don’t fight your natural tension. It doesn’t matter if you’re a tight stitcher or a loose stitcher or somewhere in between; what matters is that you recognize and accept that tendency and change your tools to meet your needs. By the time you’re finished with this project, you should know which hook size you prefer with your chosen yarn and if you’re truly at one with your tension, your edges will be straight! If they’re not, though, don’t fuss. Throw some fun buttons on there and no one will ever notice.
Suggested Materials:
Wollelfe Extrafine Merino & Silk Gradient Yarn in Fresh or Color of Choice, 100g for a small cowl
D/3.25mm, E/3.5mm, F/3.75mm, and G/4.0mm Crochet Hooks
Stitch Marker(s)
Scissors
Darning Needle
Buttons (optional)
Gauge:
Using suggested materials as stated above, 20 stitches equaled 4” on my hooks with the final piece measuring about 28” long and 11.5 high – adding the buttons stretch it to about 12” along the joined edges.
Notes:
Beginning chain 3 or chain 4 counts as first stitch of row; replace with a faux dc/tr or stacked dc/tr for a neater edge if desired.
Instructions:
Starting with your largest hook size (G), chain 136.
Row 1: ch 1, turn. Sc in ea st across. (135 sc)
Row 2: repeat row 1.
Row 3: with next smaller hook (F) ch 1, turn. Hdc in ea st across. (135 hdc)
Row 4: repeat row 3.
Row 5: with next smaller hook (E) ch 3, turn. Dc in next st and ea st across. (135 dc)
Row 6: repeat row 5.
Row 7: with next smaller hook (D) ch 4, turn. Tr in next st and ea st across. (135 tr)
Row 8: repeat row 7.
Rows 9 – 10: with next larger hook (E) ch 3, turn. Dc in next st and ea st across. (135 dc)
Rows 11 – 12: with next larger hook (F) ch 1, turn. Hdc in ea st across. (135 hdc)
Rows 13 – 14: with next larger hook (G) ch 1, turn. Sc in ea st across. (135 sc)
Rows 15 – 38: repeat rows 3 – 14 twice.
Finish off and sew in ends.

Isn't it just delightful!? I do recommend blocking to crisp up your edges and corners.
Joining:
You can, of course, simply sew your edges together with your seaming method of choice, but I think buttons are a fun option! You can really make this piece your own by adding some funky buttons – just make sure you test your button sizes against the openings between stitches in your cowl!

Using the double crochet rows closest to your single crochet rows as your button holes will give you the most evenly spaced buttons. I used six 5/8" or 16mm wooden buttons placed between the third and fourth stitches from the edge. If you want to use a smaller button, a 7/16" or 11mm button fits well in the half double crochet rows - for me, that is. If your gauge is different than mine, you'll have different sized "button holes" to work with. And if you simply can't decide which buttons you want to use, like me, try making your own toggle buttons!
All I did was thread some yarn through both buttons with their backs facing, using my fingertip to space them apart about a quarter inch and then I triple knotted the yarn in between them and trimmed the yarn ends close - but not TOO close - to the knot. That is, I tied a square knot, plus one half knot: right over left, left over right and carefully cinching it down, then right over left one more time and finally pulling the knot nice and tight.
Please forgive the terrible lighting on these, but you should be able to get the idea - baby was sleeping and I decided I'd better just work with what I had at the time!


Voila! See? Buttercups!

I hope you enjoyed this project and I’d love to see your creations, too, so if you feel like sharing, pop on over to my Facebook page or tag me @crochetcetera on Instagram or Twitter and show me what you come up with!
Many thanks to my pattern testers, including Denise Smith – I couldn’t do this without them!!
This pattern will always remain free here on my website and for your convenience, you may also download a pdf for this pattern, which includes a color coded chart as a bonus feature, for a small fee through Ravelry.

© 2017 Crochet Cetera by Connie Lee
I invite and encourage you to sell any items made from my patterns; I simply ask that you credit me
for the design, especially if listing online, by linking back to the source of the pattern.
Copying, redistributing, or selling the pattern itself or a derivative thereof is strictly prohibited.
You can contact me at crochet.cetera@gmail.com or find me online here:
Website: http://www.CrochEtCetera.com
Facebook: http://www.facebook.com/CrochEtCetera
Instagram: http://instagram.com/crochetcetera


Comments